
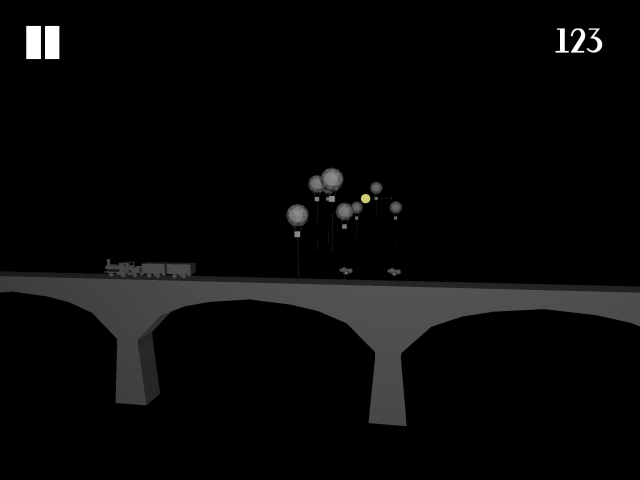
In my previous post I made an overview of the key concepts of Metal and how they differ from OpenGL. Now I’m going to describe the rendering process for a single frame in Le Voyage as well as introducing the high level architecture for the Metal Renderer implementation.

As mentioned before, Metal let us do the most expensive things less often and that’s why this post is split into two big sections: Initialization and Rendering
Initialization
Before going deeper into the rendering process, I’m going to mention a couple of things that need to be properly set up from the start in order for us to render anything on the screen. These steps should be performed as few times as possible and usually at the beginning of the program or, for example, when the encapsulating View Controller is created/loaded.
Creating a Device
In Metal, the MTLDevice protocol is an abstraction of the GPU and can be considered the root of the Metal API.
_device = MTLCreateSystemDefaultDevice();
if ( _device == nullptr ) {
   // fallback to OpenGL renderer
}
From now on, every object that we need to create (like command buffers, data buffers, textures, etc) will be done so by using this MTLDevice instance.
As a side note, if you want to know if your system (like your iPhone) supports Metal, you only need to check if a device can be created. If not, you can assume Metal is not supported and you should fallback to, for example, OpenGL for rendering. Or, you know, exit(1)…
In Crimild, a device is created when initializing a CrimildMetalView and, if successful, it continues the configuration process by instantiating the MetalRenderer. Which brings me to the next topic.
Keep in mind that if you’re running on OS X, you may end up with more than one device depending on your system’s capabilities.
Crate a Metal-based View
Much like when working with OpenGL, in order for Metal to work you need a UIView and the right layer class. iOS developers know that if you want to obtain anything drawn on the screen, it needs to be part of the Core Animation Layer tree. Metal provides a new layer type for this: CAMetalLayer.
@implementation CrimildMetalView

+ (Class) layerClass
{
    return [CAMetalLayer class];
}

@end
In Crimild, the Metal view implementation is pretty straightforward. It’s the job of the encapsulating View Controller to add it to the view hierarchy and update them using the CADisplayLink class. That allows the same view controller to easily work with both Metal and OpenGL.
Renderer Configuration
The CrimildMetalView implementation is also responsible for instantiating the MetalRenderer class, provided Metal is supported of course.
As in any other Renderer implementation, the MetalRenderer class provides a configuration mechanism, which in this case will set up both the layer and the command queue as follows:
void MetalRenderer::configure( void )
{
   Renderer::configure();
   _layer = (CAMetalLayer *) getView().layer;
   _layer.contentsScale = [[UIScreen mainScreen] scale]; // 1
   _layer.pixelFormat = MTLPixelFormatBGRA8Unorm;
   _layer.framebufferOnly = true;
   _layer.presentsWithTransaction = false;
   _layer.drawsAsynchronously = true;
   _layer.device = _device;

   _commandQueue = [getDevice() newCommandQueue]; // 2
}
The MTLCommandQueue protocol defines a queue for commands buffers. Each MTLCommandBuffer implementation will contain the translated GPU commands based on what we’re trying to do. Usually, we use command buffers to draw, but Metal provides other types of buffers too, like compute or blit buffers. Additionally, implementations of the MTLCommandEncoder protocol are the ones that perform the translations of our pipelines into GPU commands. Am I going too fast? Don’t worry, I’ll talk about these guys a lot in later posts.
Ok, everything’s setup. Let’s move on to the drawing phase.
Rendering a Frame
In Le Voyage, a single frame may contain several different types of entities, such as opaque and translucent game objects, lights, textures, post-processing effects, and so on. Each of those objects need to be processed order which can be summarized as follows:
- Preparing the frame and cleaning the screen

- Render opaque objects first

- Render transparent and overlay objects
- Composite the scene with all objects
- Apply post-processing effects and display
For the sake of brevety, in the rest of this post I’m going to explain only the first and last steps, leaving the details for how to render individual objects and applying image effects for later entries in this series.
Begin Frame
void MetalRenderer::beginRender( void )
{
   Renderer::beginRender();
   _commandBuffer = [_commandQueue commandBuffer]; // 1
}
The very first step in our render loop is to obtain the next available command buffer from the command queue, so we can start pushing commands into it.
Rendering individual objects
Each object that is going to be rendered on screen must do so by specifying a MTLRenderPipeline object, containing compiled shaders, vertex attributes and uniforms, among other things. Then, rendering different objects only requires switching to the corresponding pipeline avoiding the extra overhead of changing states.
I’ll be talking about the MTLRenderPipeline class in the next post.
Presenting the Frame
Once our objects have been drawn and all effects applied, the frame it’s ready to be displayed:
void MetalRenderer::presentFrame( void )
{
   _drawable = [getLayer() nextDrawable]; // 1

   Renderer::presentFrame(); // 2

   [_commandBuffer presentDrawable: _drawable]; // 3
   [_commandBuffer commit]; // 4
}
We do so by requesting the device to provide a drawable (basically, a texture). I’ll explain why we do this at this step in the final posts where I’m going to talk about optimizations, but for now just keep in mind that this is a blocking operation and it should be done only when you’re actually going to draw something.
Once a drawable has been acquired, we render the the frame in it, then we tell CoreAnimation to present the drawable and finally we commit the command buffer to the command queue, to be processed as soon as possible.
And that’s it. Our frame is displayed and we’re ready to work on the next one.
Buffer Synchronization
There’re several things that are missing in the process described above, but I want to focus on a special one right away: buffer synchronization. In a perfect world, we can create as many buffers as we want without having to worry about the actual resources. Of course, in practice we should only create and try and reuse a finite number of buffers in order to avoid wasting memory.
Yet, a problem arises when trying to reuse buffers (or any kind of resources in multi-threaded environment). Remember that I said Metal was multithreaded by design? Well, it comes with a price. Check the following diagram:
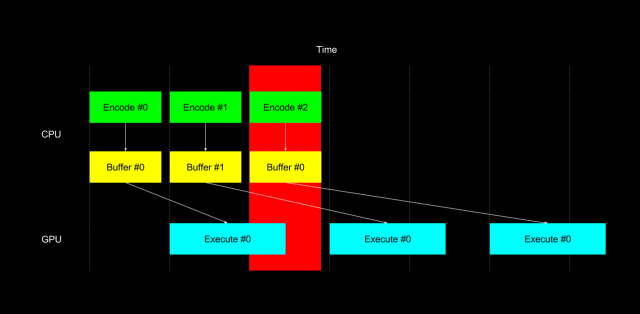
The diagram above shows two buffers being reused. Can you spot the problem? (hint: it’s highlighted with a friendly red box). First, we encode buffer #0 and dispatch it to the GPU. Then, we encode and dispatch buffer #1. After that, we cannot reuse buffer #0 right away because it’s still being use by the GPU. The solution?
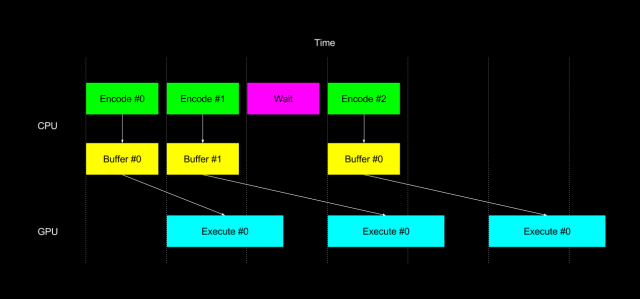
Simple, right? We just need to wait for at least one buffer to be released by the GPU in order to continue encoding new ones.
As suggested by the Metal documentation, I’m using a dispatch_semaphore_t instance to implement the waiting step. In the setup process, the semaphore is created with the maximum number of buffers we need.
void MetalRenderer::configure( void )
{
   /* ... */
   _inflightSemaphore = dispatch_semaphore_create( CRIMILD_METAL_IN_FLIGHT_COMMAND_BUFFERS );
}
Then, before starting a new frame, we wait for at least one buffer to be available.
void MetalRenderer::beginRender( void )
{
   /* ... */
   dispatch_semaphore_wait( _inflightSemaphore, DISPATCH_TIME_FOREVER );
}
Finally, when committing a command buffer, we can use a handler to signal the semaphore in order to indicate that the resource is no longer used:
void MetalRenderer::presentFrame( void )
{
   /* ... */
   __block dispatch_semaphore_t dispatchSemaphore = _inflightSemaphore;
   [_commandBuffer addCompletedHandler:^(id<MTLCommandBuffer>) {
       dispatch_semaphore_signal( dispatchSemaphore );
   }];

    [_commandBuffer presentDrawable: _drawable];
    [_commandBuffer commit];
}
The MetalRenderer class in Crimild uses a triple buffer technique. That is to say, that at any point in time there are at most three buffers being used for rendering.
Time for a break
The above description is quite simplistic but it remarks the most important aspects for rendering a single frame. If you have the felling that Metal is a little bit more cumbersome to setup than OpenGL, it’s because it actually is. We never had to worry about devices or synchronization when using OpenGL, right? Metal provides blazing fast context switching at draw time at the expense of a more verbose configuration and a more careful execution.
Like I said before, we need to start thinking things differently. When shaders became mainstream (around 2004, maybe?), we needed to do all the transform and lighting calculations ourselves in order to truly take advantage of them, which added more complexity to our programs. Well, I think the same can be said for Metal (and the newest APIs, like Vulkan too). No pain, no gain…
In the next episode post we’re going to start filling in the blanks in the above algorithm and to present the mechanisms to actually draw some objects on the screen.

Pingback: Praise the Metal – Prelude | Crimild
Pingback: Praise the Metal – Part 2: The Geometry Pass | Crimild
Pingback: Praise the Metal – Part 4: Render Encoders and the Draw Call | Crimild